Condensation, Mold, and Corrosion in Humid Lakeside RVs
Condensation, Mold, and Corrosion in Humid Lakeside RVs
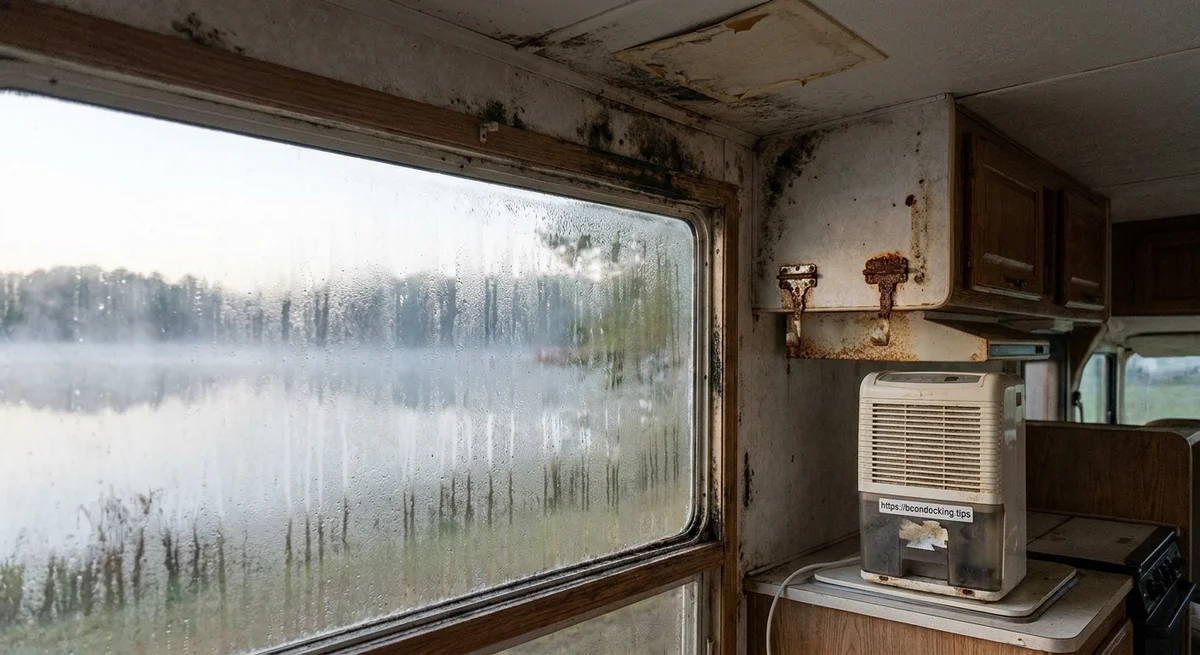
Lakeside RV camping offers fresh air and scenic dawns – but it also brings high humidity. Cool nights over still water let interior metal, glass or walls drop below the dew point, causing condensation. As one expert notes, when “warm air inside makes contact with cold glass, [it] releases excess moisture as droplets” (www.tomsguide.com). In a sealed RV at dawn, you may find windows fogged, metal fixtures wet, or soft furnishings damp. Left unchecked, this moisture attacks the RV from the inside out – feeding mold, rot, and corrosion. By understanding the physics and taking preventive steps, owners can control this dampness. Below we explain how lake‐effect condensation occurs, why it promotes mold and rust, and compare solutions from ventilation to insulation. We also cover what to inspect (wiring, connectors, cabinets), safe cleaning practices, and a monitoring plan using hygrometers to iteratively improve the situation.
Why Lakeside RVs Condense
Large water bodies boost air moisture. Evaporation over a lake raises local relative humidity (RH). At night, the RV’s exterior steel and windows cool fast by radiation, especially under clear skies. When the warm, moist air trapped inside hits those cold surfaces, it can’t hold its water vapor and condensates – much like dew on grass. Technically, condensation happens whenever interior surface temperature falls below the air’s dew point (the temperature at which air becomes saturated) (indoorhumidity.com) (www.tomsguide.com). In practice, even ordinary RV activities (cooking, breathing, swimming wetsuits) add moisture that precipitates on cool walls or windows overnight.
Moreover, lake air can remain humid well into the morning. Calm, humid nights allow heat and moisture to pool rather than disperse, so an RV’s roof or windows may stay below dew-point for hours. Subtle thermal bridges (cold metal struts, thin window frames, or plumbing chases) become condensation magnets. A thermal bridge is simply a shortcut for heat loss – for example, an aluminum window frame conducts heat 25× faster than an insulated wall (indoorhumidity.com). Where surfaces hit that dew point, water forms. As one condensation blog explains, “at 68°F and 55% RH, the dew point is around 50°F. Any glass colder than that will collect condensation” (indoorhumidity.com). Single-pane RV windows can easily reach 32°F on winter mornings, explaining heavy fogging. Even double-pane windows (inner pane ~45–55°F) will condense if RH is high.
These effects add up in a lakeside RV: more moisture in the air and colder exterior surfaces mean plenty of condensation on walls, ceilings, and metal. Without intervention, this constant dampness “creates the perfect breeding ground for mold and mildew,” which begin to grow in just days once humidity exceeds about 65% (www.tomsguide.com). It also allows metal parts to oxidize in stored water, accelerating corrosion. In summer or winter, any consistent dew inside can harm the RV.
Damage from Mold and Corrosion
Excess moisture inside an RV is a serious threat. Damp wood, fabric and insulation become mold’s playground. Experts warn that only “two days of humidity above 65%” is enough for molds to take hold in a closed space (www.tomsguide.com). Mold often starts around cool surfaces like windows and seals, then spreads under flooring or inside walls where it’s hidden. Visible signs include fuzzy spots or musty odors, but early growth in insulation or plywood may be invisible. Mold harms health (triggering allergies, asthma etc. when spores become airborne (www.tomsguide.com)) and weakens materials. In RVs with wooden cabinets or walls, persistent dampness leads to rot. One RV advice column notes that “constant exposure to condensation can lead to wood rot” in the body, threatening structural integrity (www.rvtravel.com).
Metal parts rust too. Every strand of moisture is an electrolyte that corrodes metal. Shore‐power plugs and battery terminals frequently turn brown and pitted from moisture. In one case, a shore plug became oxidized and corroded by ambient humidity, causing arcing and overheating (www.rvtravel.com). More generally, any metallic framing or screws in the RV will start to rust if they stay wet, which can ultimately weaken supports and cause leaks. In fact, builders of campers invest in drainage channels and seals just to let condensation run off before it “builds up inside and causes rotting” (www.chilicamper.nl). Carports and garages left unventilated often see cars corrode in damp conditions – the same principle applies to an RV without air exchange (www.tomsguide.com). The RV shell itself may also suffer: saturated insulation loses R-value, and water staining can delaminate panels.
In short, lakeside condensation fosters mold growth (health hazard and cosmetic damage) and metal corrosion (safety hazard). Stagnant moisture can also impair sensitive electronics. For example, corroded battery plate residue acts as an insulator, reducing power flow (www.doityourselfrv.com). RV wiring connectors, light sockets and appliances should be considered at risk: any green/white oxidation or brown pitting means action is needed. Regen storms or morning fog can soak vented areas, so that wiring in cabinetry or in basement compartments should be visibly free of rust or loosening.
The bottom line: a damp RV interior is never benign. It invites mold on fabrics and walls, and rust on appliances, hinges, gas lines and electrical parts. Preventing the moisture in the first place – or removing it promptly – is far easier than fixing mold damage and rebuilding corroded parts later.
Mitigation Strategies
Controlling moisture requires a layered approach. No single trick eliminates condensation, but these tactics each help:
Controlled Ventilation
Fresh air is the simplest drain on moisture. Even a slightly open hatch or vent allows humid indoor air to escape and dryer outside air to enter. Guidelines for homes and vehicles alike stress that “adequate ventilation [lets] moisture move instead of settling” (www.tomsguide.com). In an RV, you can keep roof vents or vent fans on low during the night, or use an on-board bathroom/convection fan after showering or cooking. Some RV fans have built‐in humidity sensors so they auto-run when RH climbs (e.g. humidity-sensing roof vents). Another option is a window-mount or wall exhaust fan that runs on a timer. Ventilation kits specifically for RVs exist, such as the roof vent with thermostat and rain sensor (www.etrailer.com).
In general, wind or a fan turning over the air will lower interior RH. Experts advise cracking a window or door occasionally (when safe) or using exhaust fans during damp activities (www.tomsguide.com). In a lakeside location, even midday airing on sunny dry days can reset the humidity. The key is consistency: preventing stagnant air is crucial, since a sealed warm RV accumulates vapor. Remember that ventilation helps only if outside air is drier; in very humid weather, it may be less effective. However, even a bit of air change can cut the RH significantly. In summary, ensure continuous or scheduled air exchange – an unsealed cabin with a slight draft is much less mold-prone than one kept hot and closed.
Desiccants & Dehumidifiers
For enclosed spaces, moisture-absorbing materials work wonders. A desiccant (drying agent) like silica-gel pouches, calcium chloride crystals or zeolite bricks can soak up water vapor in closets, beneath sinks, or in storage bays. Many RV owners use specialized “dry pack” kits designed for campers, which can remove pints of water per day. Place these in wardrobes, under the bed, and in the engine bay if stored away. As one RV tech notes, placing “moisture-absorbing products or desiccants in areas prone to condensation, such as closets and cabinets” is an effective precaution (www.rvtravel.com).
If you have power, an electric dehumidifier is even better. Small 12V or 110V dehumidifiers (desiccant or refrigerant type) will pull humidity from the air continuously. Portable dehumidifiers marketed for RVs or boats can markedly cut RH during storage, often fitting in a cabinet. (In winter, a desiccant-type dehumidifier is preferable, since refrigerant models may freeze at low ambient temperatures.) By targeting the entire cabin’s air, these units keep RH in check and dramatically reduce condensation. Running them overnight or whenever you’re plugged in can prevent the moisture build-up that fuels mold. In short, active drying (via dehumidifier) plus passive drying (via desiccant packs) both lower the dew point of cabin air, making condensation much less likely.
Thermal Breaks and Insulation
Disrupting thermal bridges prevents surfaces from going as cold. As one engineering guide explains, the goal is to “keep insulation continuous [and] break the metal-to-metal path” wherever possible (www.ozkcustoms.com). In practice, this means adding authority insulation or padding to the RV structure. For example, if the metal roof ribs or wall studs are exposed inside, wrap them with insulating tape or foam so they no longer cool the inner panel directly (www.chilicamper.nl) (www.ozkcustoms.com). Bedding insulation between studs is not enough if those beams stay bare; covering them with a thin rigid foam or quilted panel will raise the interior surface temperature.
Also check attachments: metal fasteners, bolts and brackets conduct heat. Use rubber gaskets, plastic anchors or isolator washers under screws and roof vents to introduce a thermal break (www.ozkcustoms.com). Even a few millimeters of non-metal between the cold exterior and inner skin can raise surface temperatures enough to stay above the dew point. Under a cabinet-mounted fridge or heater, add a piece of cork or rubber mat as a spacer between fasteners and the wall. Essentially, any direct metal-to-metal path on the cabin exterior should be interrupted.
Adding insulation to the roof and walls helps too. More R-value means warmer surfaces. In cold climates, some RVers upgrade windows to dual-pane or add reflective foam insulation behind trim. At the very least, install a thin layer of closed-cell foam under exterior panels to slow heat loss. By avoiding “cold spots”, you reduce where condensation can form.
Window Treatments
Windows are often the coldest surfaces in an RV, so treating them can cut condensation. Heavy curtains, roller shades, or reflective blinds create a warm air buffer. Thick insulated curtains can raise the inside glass temperature by a few degrees. One analysis notes that a modest air gap (like from a curtain or bubble-wrap film) can raise a window’s interior surface several °F (indoorhumidity.com). Similarly, special anti-condensation window films – thin polymers stuck to the glass – work by trapping heat or spreading water. For example, insulating film adds a tiny air layer that boosts the inner pane’s temperature about 3–8°F (indoorhumidity.com), which is often enough to stay above dew point unless humidity is very high. A quick test is taping bubble wrap to the window: if that spot dew-free in morning while the rest is wet, an insulating film likely helps (indoorhumidity.com).
Alternatively, hydrophilic films or sheets simply break up droplets, turning beads into a sheet that evaporates faster. These don’t reduce moisture but mitigate its harm. Ventilated window vent covers (or “buddy buffers” on RV vents) also help maintain airflow even when closed against rain. In summary, insulating covers and films can reduce condensation on windows and stop it from running into frames, but they must complement moisture control. By themselves they only address the symptom; without reducing humidity, condensation may appear on other cold spots (walls or ceilings) (indoorhumidity.com).
Targeted Heating
Finally, one can use warmed surfaces to stay above the dew point. This means keeping key areas slightly heated to discourage condensation. Simple tactics include cracking the furnace on low (10–15°C/50–60°F) during damp nights or placing a small, thermostat-controlled heater in a moist corner. For instance, mounting a low-wattage heater strip under sink cabinets or below glass windows can keep those surfaces dry. In colder regions, conductive tape antennas (like those used on RV fuel tanks to prevent freezing) can also be spliced with a tiny heater pad underneath a metal wall section. More practically, evenly distributing waste heat with a fan (for example, pointing a floorboard vent at the walls) raises the overall interior temperature and shrinks the difference with the exterior. Radiant-type heaters (oil-filled panels or underfloor mats) are especially good because they warm objects and surfaces without drying air. The goal is simply to avoid any interior surface lying below the dew point for long. Even a few degrees of warmth can be the difference between steady condensation and a bone-dry wall.
In practice, these tactics work best together. Ventilation and humidity control are first priorities, insulation/thermal breaks remove cold triggers, window treatments act as barriers, and spot heat ensures no “cold islands” remain. With this combo, lakeside moisture can be managed.
Inspection and Maintenance
Routine checks are crucial. Electrical connections and wiring should be examined for moisture damage. Look at the shore power inlet, battery posts, and 12V connectors in compartments. Any green/white crust or brown pitting indicates corrosion. For example, an RVer noted that a brown, pitted shore plug meant “oxidation from moisture and air” and risk of sparks (www.rvtravel.com). When found, clean contacts with a quality contact cleaner (like DeoxIT) and lubricate them; replace badly eaten terminals (www.rvtravel.com). Inspect battery terminals too: white/blue deposits are battery acid corrosion. Neutralize them with baking soda solution and brush clean (www.doityourselfrv.com). After cleaning, use felt washers and terminal grease to slow future corrosion (www.doityourselfrv.com). Also check any exposed wire nuts or inline connectors in damp areas (bathroom, cockpit) – if moisture can reach them, they need sealing or replacement with waterproof connectors.
Inside the RV, pursue visual and physical inspection for hidden moisture: walls, ceilings, and cabinetry. Feel around roof vents, AC units, skylights and seams; any soft spots or black stains suggest leaks or condensation. A practiced tip is to open overhead cabinets and probe the top corners: if the ceiling-wall seam inside a cabinet is discolored or soggy, moisture is present (rv101withmarkpolk.com). Likewise check behind bread racks, in closets, and under seats. Don’t forget under sinks and around plumbing – condensation drips can look like a leak. In storage bays or compartments, inspect the floor and sprayed adhesives for mold or rust. Seal maintenance is part of this – reseal roof vents or windows at the first sign of separation.
Cleaning Protocols and Safe Biocides
If mold appears, tackle it immediately. Always wear appropriate PPE: an N95 mask or respirator, gloves, and eye protection (CDC guidance) (www.cdc.gov). Remember that disturbing mold can send spores airborne. For hard surfaces (metal, tile, tempered glass), CDC recommends scrubbing with a mold cleaner or diluted bleach solution (no more than 1 cup bleach per gallon water) (www.cdc.gov), ensuring the area is ventilated. You can also use hydrogen peroxide (3% solution) – it’s antimicrobial and safe on many surfaces. Research shows hydrogen peroxide can kill molds on solid surfaces (www.healthline.com); simply spray, let it bubble 10–15 minutes, then wipe clean (www.healthline.com). (Never mix bleach with ammonia or vinegar – toxic gases can form (www.epa.gov).)
For fabrics or wood, bleach often discolors or cannot penetrate mold roots. In those cases, use a laundry sanitizer or specific biocide labeled for porous materials, or consider replacing the item. Even dead mold spores can trigger allergies, so removal is the goal (www.epa.gov). Minimal surfaces (countertops, tables) can be treated with household ingredients: white vinegar and baking soda have antifungal properties (www.healthline.com) (www.healthline.com). Vinegar (undiluted) kills some molds by lowering pH; baking soda in water can inhibit mildew (www.healthline.com). Tea tree oil is also effective but aromatic and costly (www.healthline.com). In general, cleaning steps are: dilute cleaner → apply and let dwell → scrub vigorously → rinse and dry. Use a HEPA-filter vacuum after surfaces dry to catch spores. Finally, lower the cabin humidity under 50% (ideally 40–50%) to keep remaining spores dormant (www.tomsguide.com) (www.healthline.com).
Avoid relying solely on biocides. The U.S. EPA explicitly notes that using a biocide like bleach on mold is not a routine fix in most cases (www.epa.gov); it kills organisms but leaves their allergens behind. Biocides are a complement to cleanliness, not a cure-all. After cleaning mold surfaces, the source of moisture must be fixed or mold will simply recur.
Monitoring and Iterative Improvement
A data-driven approach pays off. Install one or more digital hygrometers (humidity and temperature sensors) inside the RV. Place them in representative spots – e.g. bedroom, kitchen/galley, and near any suspected trouble spot (like a window or fridge). As one condensation expert suggests, “get a hygrometer – a decent one runs under $20 – and check your readings at different times of day” (indoorhumidity.com). Record the RH and temperature periodically (morning and night), and note any activities (showers, rain, cooking) that might spike humidity.
Aim to keep RH below about 50%, since mold growth becomes unlikely below that level (www.healthline.com). Plotting your data will reveal patterns: perhaps humidity always peaks after showers or during cool, calm mornings. If you see trouble, adjust: run the vent fan later, add more desiccant, or crank the heater slightly. Many modern hygrometers (or home sensors) can log data via Bluetooth or smartphone apps, making it easy to track trends over weeks. Use this feedback: for example, if after adding vent fans the RH still rises above 60%, consider adding a dehumidifier or even routinely airing out the RV on dry, windy days.
Continuous monitoring gives you iterative improvement. For instance, if interior RH drops consistently on nights when vents are open, you know the ventilation strategy works. If certain corners always stay damp, you might install a small space heater or add insulation there. Monitoring ensures that your mitigation tactics pay off (or tells you when to try something new).
By combining observation with action, you preserve the RV’s interior. The rainy season or lakeside humidity doesn’t have to defeat you when you know what’s happening and when. Over time, the goal is a dry RV: sensors show RH in a safe range, no new mold appears, and metal gear stays shiny rather than rusty.
Conclusion
Lakeside RVs face a battle against moisture. But understanding condensation physics – warm moist air meeting cold surfaces – and its consequences (mold, corrosion) empowers owners to fight back. Ventilate regularly, deploy desiccants or dehumidifiers, interrupt thermal bridges, insulate windows, and even apply gentle heat to cold spots. Coupled with careful inspections (checking wiring and cabinetry for dampness) and safe cleaning protocols (scrubbing mold with bleach or peroxide per CDC/EPA guidance), these steps keep the interior dry. Finally, monitor the humidity: use hygrometers and logs to refine your strategy seasonally. Taking an iterative, data-driven approach ensures that each tweak (be it a fan schedule or new insulation) is backed by evidence.
With such a systematic plan, mold and rust become manageable nuisances rather than constant threats. The result is an RV interior that stays fresh and safe, ready for comfortable camping even by the misty lake.
Get New Boondocking Research & Podcast Episodes
Subscribe to receive new research updates and podcast episodes about boondocking, off-grid camping, RV travel, van life, dispersed camping, campsites, gear, power, water, safety, and road trip planning.